

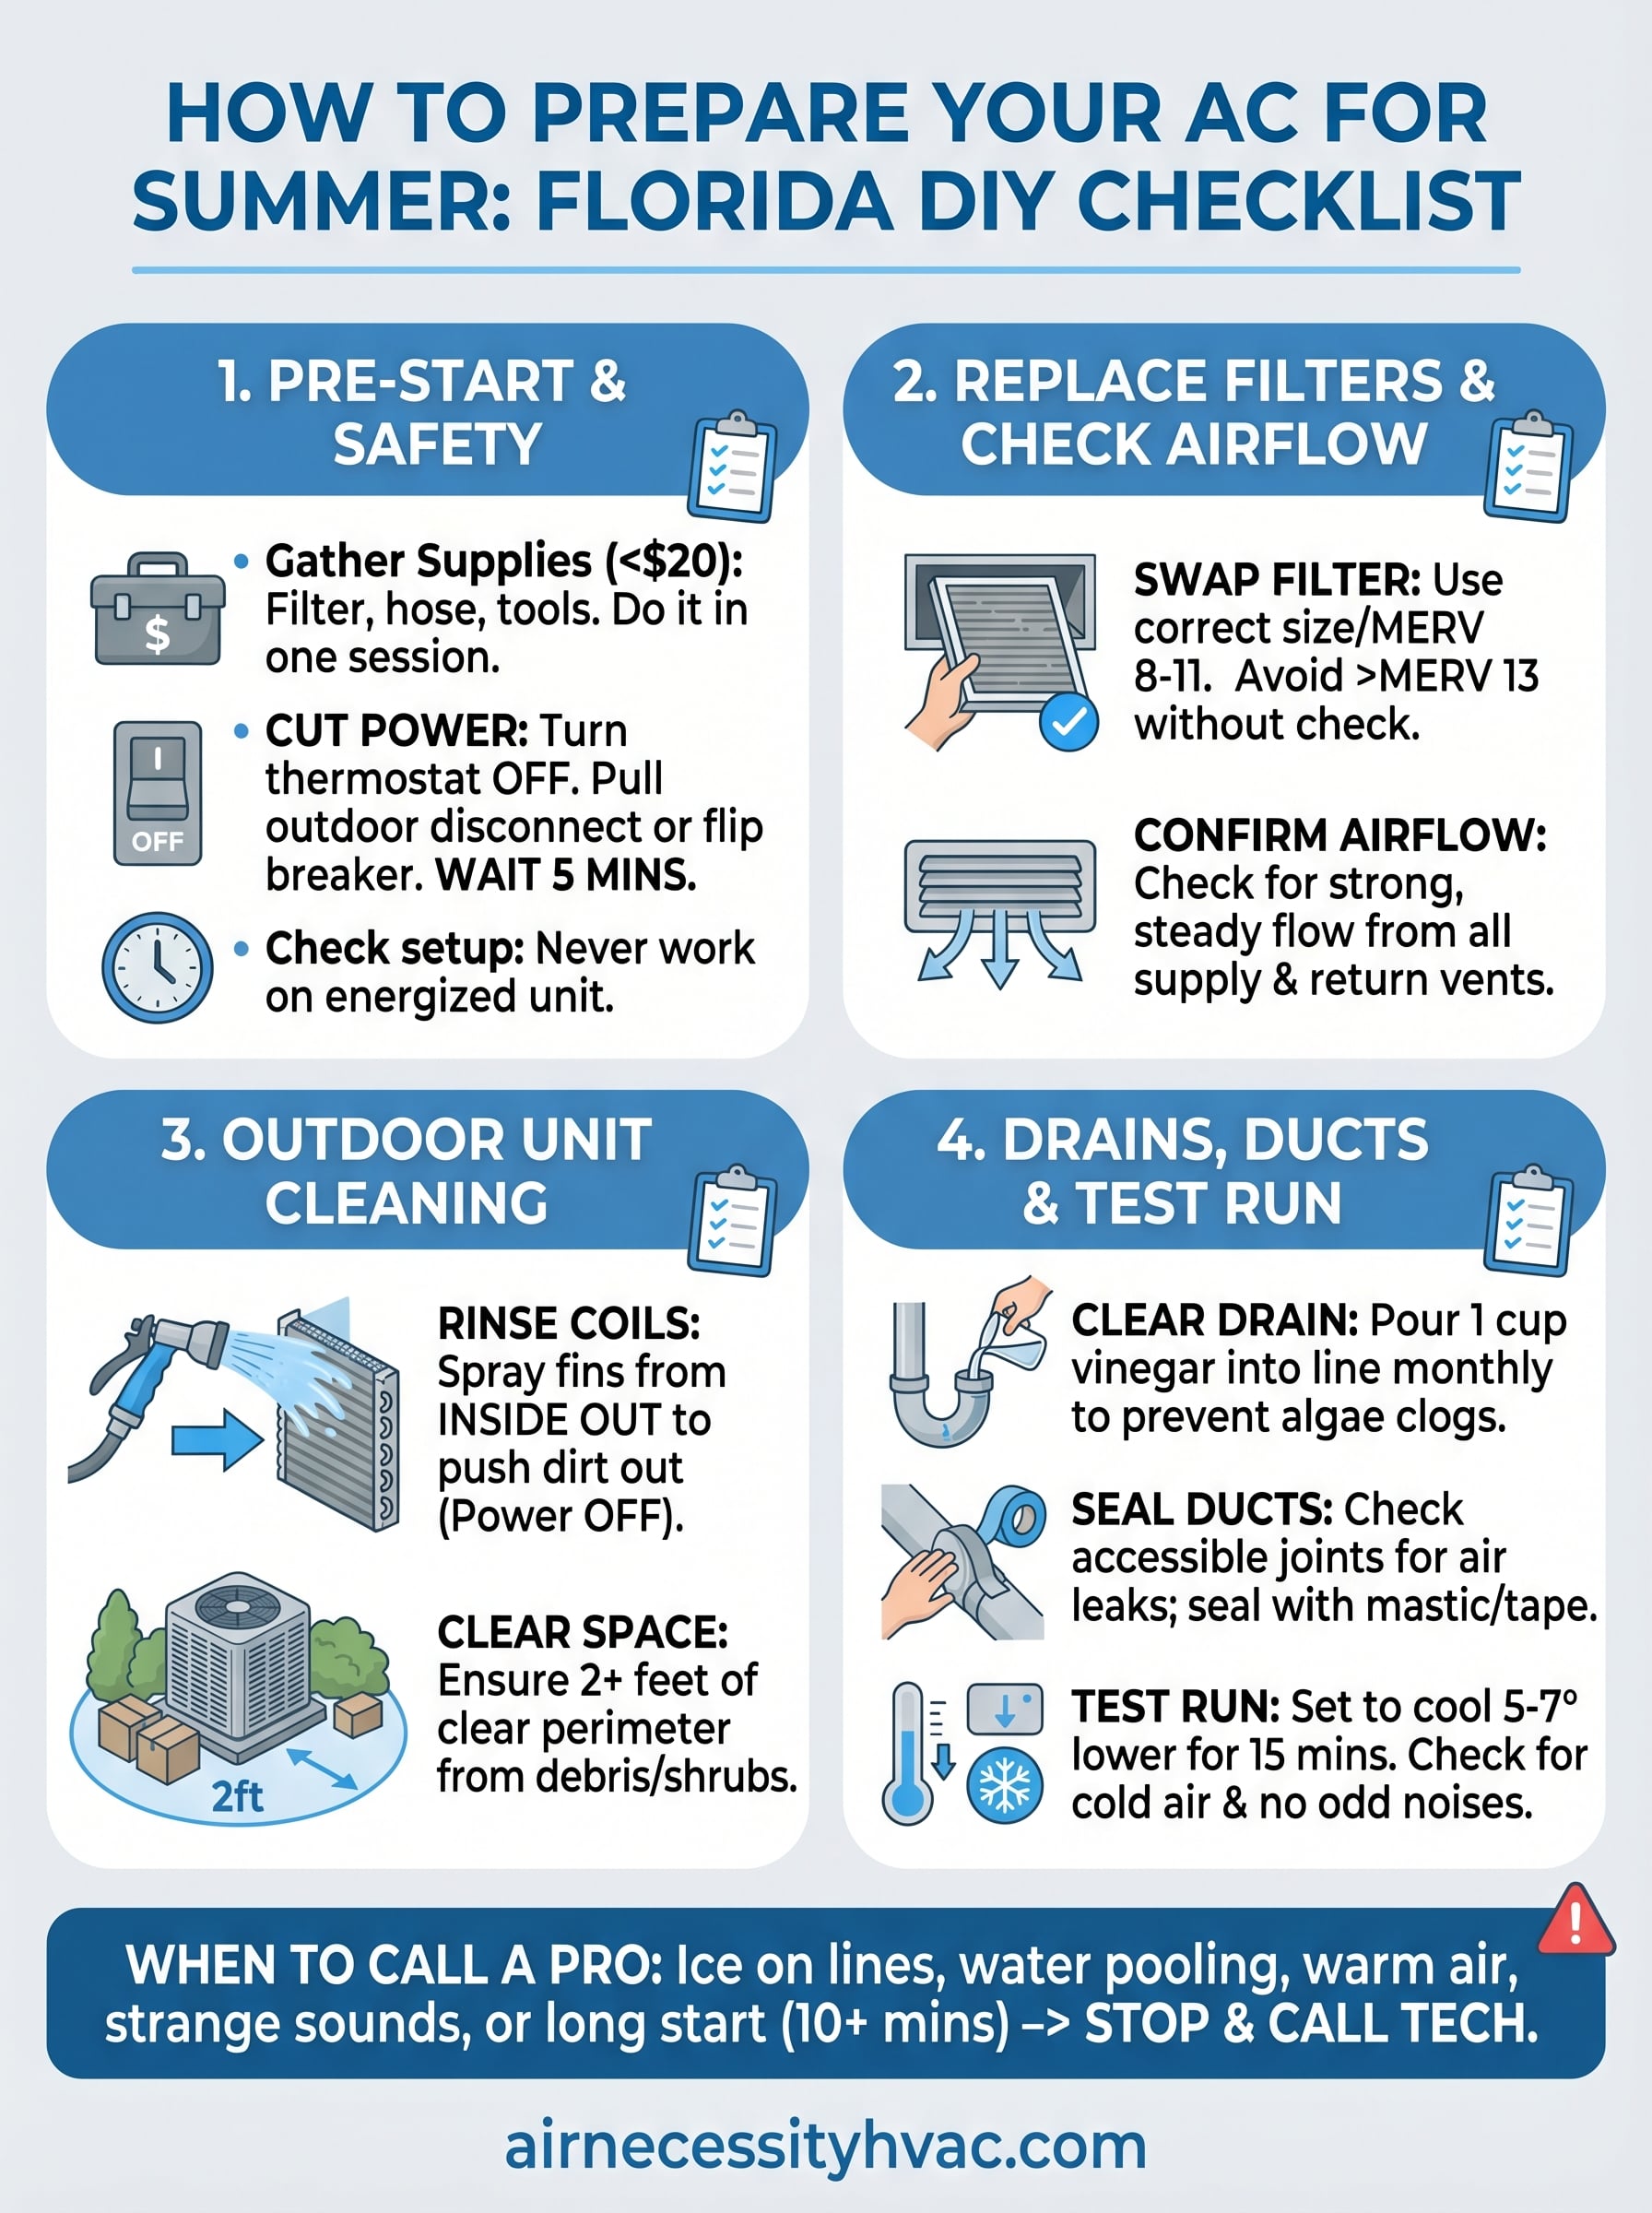
Southwest Florida summers don’t ease in, they hit hard and fast, often pushing AC systems to their absolute limit for months on end. If you’re wondering how to prepare your AC for summer, the time to act is now, before temperatures climb into the 90s and your unit is running nonstop from morning to midnight.
The good news? A lot of the prep work doesn’t require a technician. With a few basic tools and an hour or two, you can handle most of the checklist yourself, and catch small problems before they turn into expensive emergency calls. At Air Necessity, we work with homeowners across Cape Coral, Fort Myers, Naples, and the surrounding areas every summer, and the breakdowns we see most often are ones that simple maintenance could have prevented.
This guide walks you through a straightforward, step-by-step DIY checklist to get your cooling system cleaned, inspected, and running efficiently before the heat sets in. We’ll cover what you can do on your own, what to look for, and when it makes sense to call in a professional.
What you need before you start
Before you run through how to prepare your AC for summer, take five minutes to gather your supplies and set yourself up properly. Most of what you need costs under $20 total, and having everything within reach means you won’t stop halfway through to make a hardware store run. Going through the full checklist in one uninterrupted session is the most efficient way to catch problems and get your system ready before the heat arrives.
Tools and supplies
You don’t need a technician’s toolkit to cover the basics. A garden hose, a fresh filter, and a screwdriver will handle the bulk of this checklist. Here’s a full list of what to have ready before you start:
- Air filter in the correct size and MERV rating (check your system’s manual or read the dimensions off the existing filter’s frame)
- Garden hose with a spray nozzle
- Flat-head and Phillips-head screwdrivers
- Fin comb or a soft-bristle brush
- Wet/dry vacuum
- Flashlight
- Pen and paper or your phone for noting anything unusual
Pull out your existing filter and photograph the label before going to the store. That way you buy the right size and replacement type without guessing.
Power and safety
Never work around your outdoor condenser or air handler while the system is energized. There are two common ways to cut power depending on your setup, so confirm which one applies to your unit before you touch anything.
Follow these steps in order:
- Set your thermostat to “off”
- Locate the disconnect box mounted on the exterior wall near your outdoor condenser
- Pull out the disconnect block or flip the disconnect switch inside the box
- If your system has no disconnect box, go to your main breaker panel and turn off the AC circuit
- Wait at least five minutes before opening any panels to give the capacitor time to discharge safely
Step 1. Replace filters and check airflow
Your air filter is the first line of defense for your system, and a clogged one forces your AC to work harder while pushing dirty air through your home. In Florida’s climate, filters clog faster than the national average because of high humidity, dust, and pollen. Swapping it out takes under two minutes and delivers an immediate improvement in both airflow and air quality.
Pick the right filter for your system
Not every filter fits every unit, and using the wrong MERV rating can restrict airflow and strain your blower motor. For most residential systems in Southwest Florida, a MERV 8 to MERV 11 filter strikes the right balance between filtration and airflow. Going above MERV 13 without checking your system’s specs may cause more harm than good.
A MERV 8 filter traps common allergens and dust effectively without overworking your system’s blower.
Confirming airflow after the swap
Once the new filter is seated, walk to each supply vent and hold your hand near the grille. You should feel strong, consistent airflow from every register. Weak airflow in one room may point to a duct issue you’ll address in Step 3.
Check for steady output at:
- Supply vents in each room
- Return air grilles (airflow should pull inward here, not push outward)
- Hallway registers
Step 2. Clean and clear the outdoor unit
Your outdoor condenser pulls heat out of your home, so when leaves, grass clippings, or dirt clog the fins and restrict airflow, efficiency drops fast. This is one of the most overlooked steps in how to prepare your ac for summer, and it takes less than 20 minutes with your garden hose.
Remove debris and rinse the coils
Start by cutting power using the disconnect steps from the setup section. Then clear any vegetation, leaves, or debris from around the unit by hand. Next, use your garden hose to spray the fins from the inside out, which pushes dirt outward rather than compacting it deeper into the coil.
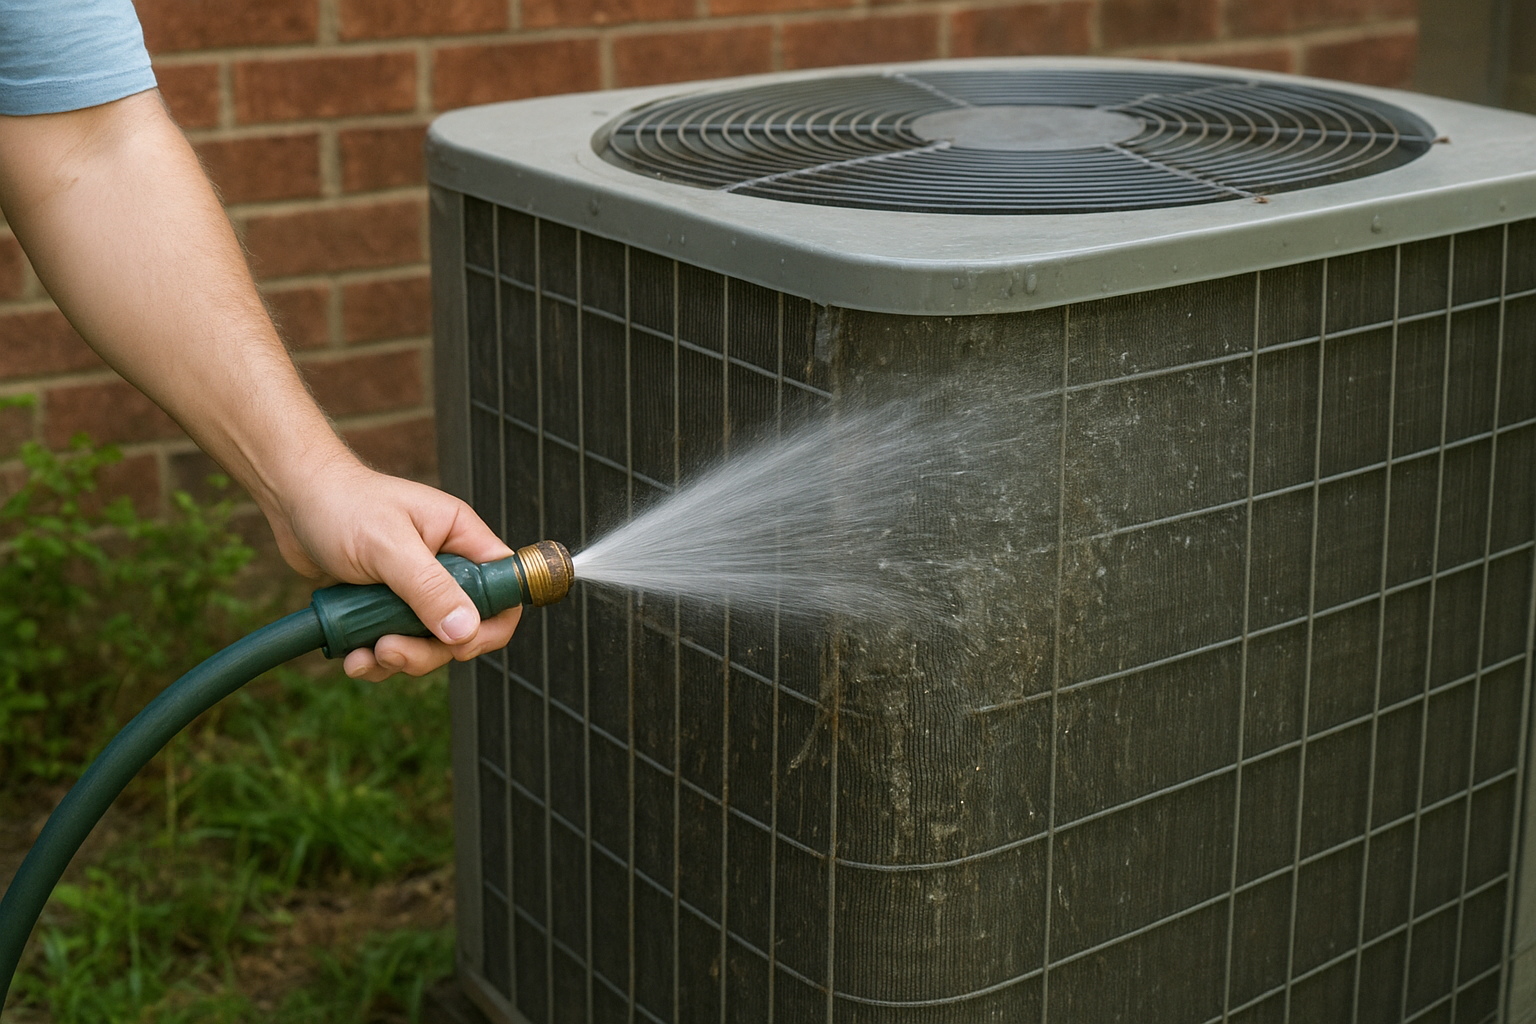
Spray from top to bottom, not side to side, to avoid bending the fins.
Follow this sequence:
- Remove the top grille if accessible and pull out any large debris by hand
- Spray the fins from the inside out at a 45-degree angle
- Rinse the exterior housing to remove surface dirt buildup
Check clearance around the unit
Your condenser needs at least two feet of clear space on all sides to pull in air without restriction. Trim back any nearby shrubs, and confirm that no outdoor furniture or stored items sit within that perimeter before you restore power.
Step 3. Check drains, humidity, and duct leaks
This step covers three areas that directly impact comfort and system health but often get skipped when learning how to prepare your ac for summer. Florida’s humidity makes each one more critical than in drier climates, and skipping them is a fast way to end up with water damage or uneven cooling.
Clear the condensate drain line
Your AC pulls moisture from the air and routes it out through the condensate drain line. In a humid climate, algae and slime build up inside that line quickly, causing clogs that lead to water overflow and potential ceiling damage. Pour a cup of white vinegar into the drain access port near your air handler, then flush it with water after 30 minutes.
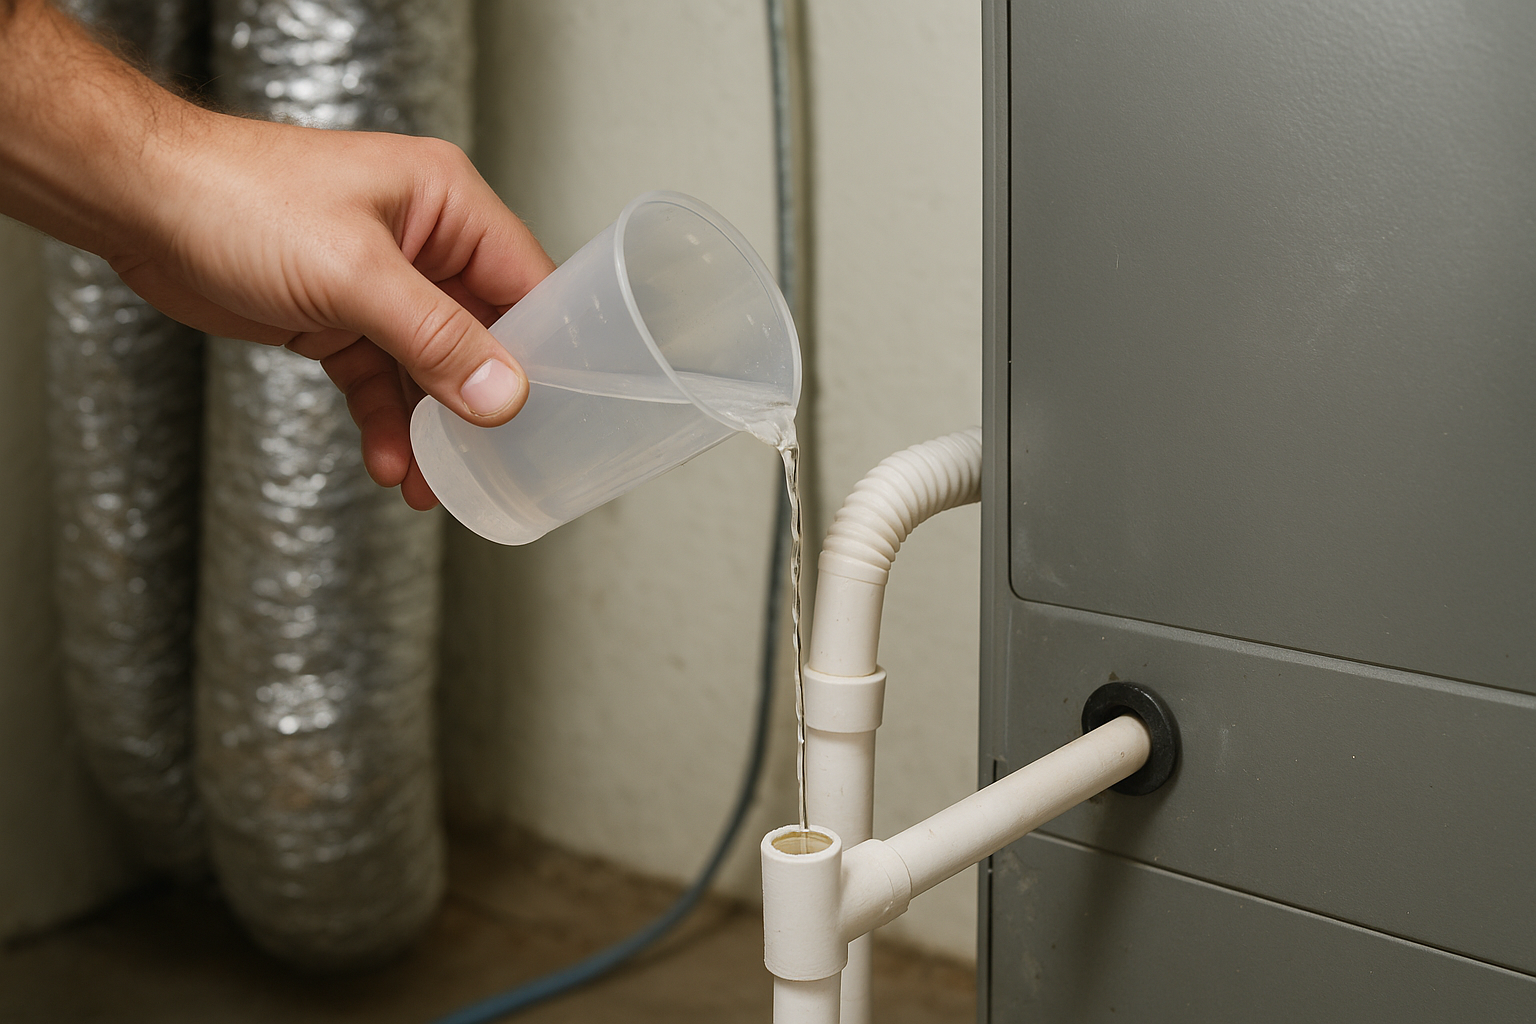
Do this every 30 days during peak cooling season to keep the line clear and prevent overflow damage.
Check for duct leaks
Leaky ducts push conditioned air into your walls and attic instead of your rooms, which raises energy bills and creates hot spots throughout your home. Run your system and move your hand along accessible duct joints in your attic or utility closet. Seal any escaping air with:
- Mastic duct sealant on joints and seams
- Metal-backed tape for quick repairs on straight sections
Step 4. Test run and know when to call a pro
With everything cleaned and checked, restore power and run your system through a live test before summer arrives. This final step in how to prepare your ac for summer confirms your system is actually performing rather than just running.
Run a full system test
Set your thermostat to cool mode at 5 to 7 degrees below the current indoor temperature. Let the system run for 15 minutes, then check that each supply vent is pushing cold air and your indoor unit is draining steadily. Normal operation means cool air within a few minutes and no unusual sounds from either unit.
Watch for these during the test run:
- Ice forming on the refrigerant lines
- Water pooling under the air handler
- Warm air blowing from supply vents
- Grinding, rattling, or squealing sounds
Warning signs that need a professional
If your test reveals any of the issues above, stop running the system and contact an HVAC technician rather than pushing through it. Running a struggling unit causes further damage and drives up repair costs.
If your system takes more than 10 minutes to start cooling, that points to a refrigerant or electrical issue that requires a licensed technician.
Refrigerant leaks, failed capacitors, and blower motor issues are not DIY repairs. Attempting them without proper training and equipment creates serious safety risks and voids your system’s warranty.
Ready for the first heat wave
You now have a complete picture of how to prepare your AC for summer the right way, without guessing or skipping the steps that matter most in Florida’s climate. Replacing your filter, rinsing the condenser, clearing the drain line, and running a live test puts your system in a strong position before the heat arrives and demand on your unit climbs to its peak.
Most of what’s on this checklist takes under two hours and costs very little. What it saves you is an emergency call on a 95-degree afternoon when technicians are booked out for days. Run through this list now, note anything unusual, and address it before the season starts rather than during it.
If your test run flagged something you can’t fix yourself, the team at Air Necessity is ready to help, with honest diagnostics and no commission-driven upsells, just a system that works when you need it most.